Masih lanjutan dari blog minggu lalu, aku akan membahas tentang data logging. Apa itu?
Jadi kita akan buat rekapitulasi dari data sensor di suatu sheet (biasanya sih pakai IFTT tapi kali ini aku mau yang beda hehe)
Oke, buat yang belum baca blog sebelum ini, bisa dibuka ya link ini :
https://coretangrace.blogspot.com/2020/03/data-visualization-esp32-and-dht11.html
Peralatan
- Jumper Cable female to male (3 pcs)
- Jumper Cable female to female (2 pcs)
- Breadboard
- ESP32 (30 pins)
- USB Cable Type A
- DHT11
Rangkaian
Kode Program
Jangan lupa untuk download library CircusESP32Lib terlebih dahulu. Kemudian extract dan copy ke direktori tempat file arduino kamu install.
#include //CircusESP32Lib.h *hapus tanda // dan tambahkan < >*
#include  //DHT.h *hapus tanda // dan tambahkan < >*
// ------------------------------------------------
// These are the CircusESP32Lib related declarations
// ------------------------------------------------
char ssid[] = "your_SSID_here"; // Place your wifi SSID here
char password[] =  "your_password_here"; // Place your wifi password here
char token[] = "your_token_here"; // Place your token, find it in 'account' at Circus. It will identify you.
char server[] = "www.circusofthings.com";
char temperature_key[] = "xxxxx";  // Place the Key of the signal you created at Circus Of Things for the Temperature
char humidity_key[] = "xxxx";  // Place the Key of the signal you created at Circus Of Things for the Humidity
CircusESP32Lib circusESP32(server,ssid,password); // The object representing an ESP32 to whom you can order to Write or Read
// ------------------------------------------------
// These are the Temperature Example related declarations
// ------------------------------------------------
#define DHTPIN 27      // digital of your ESP32 connected to DHT11
#define DHTTYPE DHT11 // exact model of temperature sensor DHT 11 for the general library
DHT dht(DHTPIN, DHTTYPE); // The object representing your DHT11 sensor
void setup() {
   Serial.begin(115200); // Remember to match this value with the baud rate in your console
   dht.begin(); // Set the DHT11 ready
   circusESP32.begin(); // Let the Circus object set up itself for an SSL/Secure connection
}
void loop() { // Now that all is set up, let's begin with the tasks
   delay(10000);
   // Let the library get the Temperature that DHT11 probe is measuring.
   float t = dht.readTemperature();
   if (isnan(t))
       t=-1; // if so, check the connection of your DHT11 sensor... something is disconnected ;-)
   float h = dht.readHumidity();
   if (isnan(h))
       h=-1; // if so, check the connection of your DHT11 sensor... something is disconnected ;-)
   // Show values, just for debuging
   Serial.println(""); Serial.print("Temperature: "); Serial.println(t); Serial.print("Humidity: "); Serial.println(h);
   // Report the values gathered by the sensor to the Circus
   circusESP32.write(temperature_key,t,token); // Report the temperature measured to Circus.
   circusESP32.write(humidity_key,h,token); // Report the humidity measured to Circus.
}
Nah seperti yang aku bilang sebelumnya, aku bukan pakai IFTT - Google Sheet tapi aku pakai Circus of Things. Tidak jauh berbeda dengan sebelumnya karena ternyata aku buatnya terlalu bersemangat sehingga tidak sengaja mengerjakan modul eksperimen untuk minggu data logging (hehe maaf pak..). Jadi di bawah ini aku bakal jelasin sekali lagi bagaimana mengaturnya di Circus of Things.How to get temperature_key, humidity_key dan token?
Buka dan buat akun kamu di https://circusofthings.com/

Jangan lupa verifikasi via email ya. Setelah itu kamu masuk ke 'Account' dengan klik profile icon di pojok kanan dan copy bagian token pada profil kamu dan paste ke token[] pada kode program.
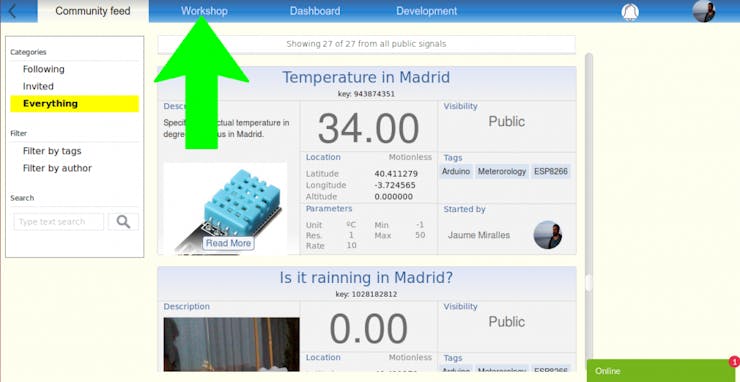
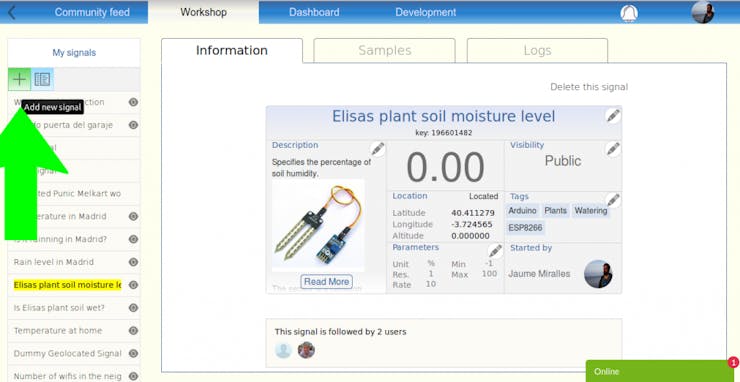
- Setelah itu pilih Workshop. Lalu klik Add Signal.


- Kemudian atur nama tab signal, di sini aku set dengan Temperature dan Humidity (maafkan itu aku typo hehe)
- Copy key yang ada di bawah "Temperature" dan "Humidity" dan buat ke variabel temperature_key[] dan humidity_key[].
- Selesai.
Simulasi
Dilihat dari gambar diatas, data dari sensor dikumpulkan setiap 17 menit. Nah data logging ini bisa dimanfaatkan untuk memprediksi cuaca di kemudian hari loh. Dan kalau mau simpan data-data tersebut, tinggal di klik aja deh "Save displayed to CSV".
Okee, sekian blog hari ini.
Tetap sehat semuanya dan STAY AT HOME ya teman-teman.
Semangat! Sampai bertemu di blog selanjutnya..


Tidak ada komentar:
Posting Komentar